


Step 1. Start creating a listing
Step 2. Tell eBay what you are selling
Step 3. Add photos and a video
Step 4. Provide titles and specify the category
Step 5. Add item specifics and variations
Step 6. Describe your item and specify the condition
Step 7. Choose the format and price your item
Step 8. Set up shipping details
Step 10. Specify your selling preferences
Step 11. Set up charity option
The detailed guide
Step 1. Start creating a listing
To get started creating a listing you can:
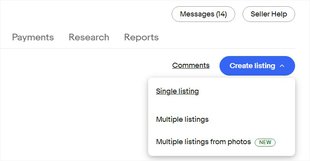
- Click the Create listing button on the Seller Hub Listings tab (from the dropdown menu, choose Single listing options)
- Click the Create your listing button at the top right of any export.ebay.com page
- Use the quick link
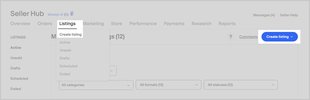

On the Listings tab of the Seller Hub, you can also choose other options from the dropdown menu:
- Create multiple listings with the Bulk Listing Tool. It lets you manage up to 2,000 active listings simultaneously and run your business more efficiently. Learn more
- Create multiple listings from photos using the new AI-powered bulk listing tool. Learn more
Step 2. Tell eBay what you are selling
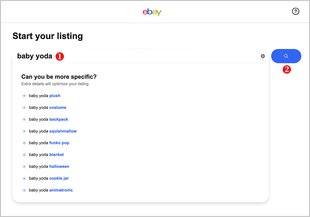
In the search field (1), type the name of your item or its product identifier and click the search button (2). The more words are in your request, the more accurately eBay will suggest the relevant products for you to choose from.
It is highly recommended to use digital identifiers if you have any (f.e. GTIN, UPC, EAN, ISBN, MPN). They save your time and help you find the exact match in the eBay catalog. Read more about product identifiers.
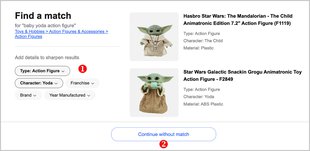
Then you can use the left menu (1) to refine the category and add details to sharpen results.
- If any of them matches your item, click it, and the system will automatically pre-fill the item details for you.
- If none of the suggested products suits you, select Continue without match (2) at the bottom of the page.
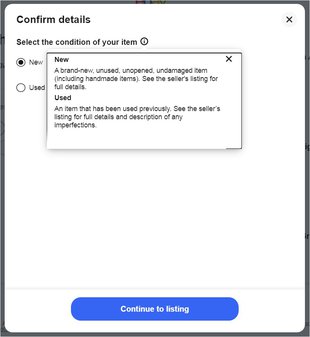
After that, select the condition of your item: whether it is brand-new or used.
Step 3. Add photos and a video
Begin filling in all necessary information about your item and any additional details that will make your listing more informative and attractive to buyers.
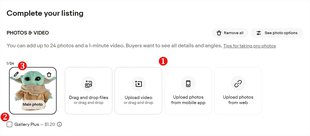
Upload high-quality images and a video that showcases your item, highlights its unique features, or demonstrates how to use or install it. You can drag and drop the files to the browser, import them from mobile app or online storage (1).
Photos should be:
- jpeg, png, gif, tiff, heic or bmp formats
- at least 500px on the longest side
- maximum 24 per one listing
Videos should be:
- mp4 or mov formats
- with a 150MB limit, or about one minute long
Select the checkbox next to the Gallery Plus option (2) to display a large photo in search results. A listing fee may apply whether or not your item sells.
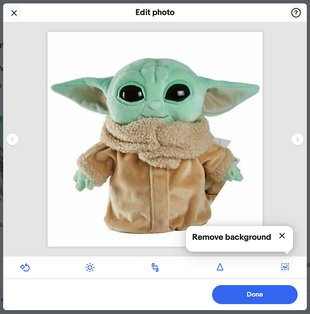
If needed, you can edit your pictures in a built-in photo editor (3) that features a useful background removal tool.
Want to showcase your items in the best possible way? Read the best photo and video tips for eBay sellers.
Step 4. Provide titles and specify the category
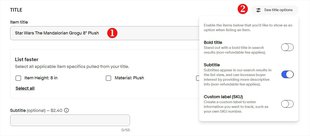
Provide an informative title of up to 80 characters (1).
In addition to your main title, you can enable (2) the following options:
- Bold title — Stand out in search results*
- Subtitle — It appears in eBay search results in list view, and can increase buyer interest by providing more descriptive info*
- Custom label (SKU) — Create it to enter information you want to track, such as your own SKU number
Pick the category that’s most relevant for your item (1). If you have an eBay Store, select the Store categories (2) of the items you're listing. You can also choose to list in a second category* — click Edit (3) on the right.

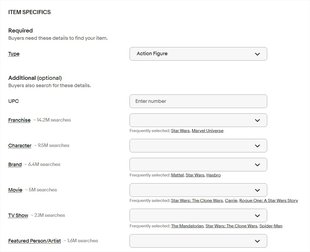
Step 5. Add item specifics and variations
Provide the required item specifics such as the product type. You'll also see a list of item specifics eBay recommends you add (f.e. color, style, packaging, product line), as buyers frequently search for these details.
The contents of this section depend on the item category. The more details you provide, the higher the chances that a customer will find your item on eBay or external resources such as Google Shopping.
If you have similar items, you can save time and money by listing multiple variations of your item in one multi-quantity, fixed price listing. This option is only available in select categories.
- If you can't see the Variations section, go to the Pricing section and select Edit. Set the Auction toggle to off and select Done. The Variations section will now appear above the Condition section
Read more about Listings with variations.
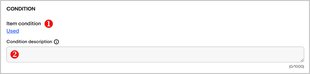
Step 6. Describe your item and specify the condition
Provide a condition (1) for your item such as New, Used, or Refurbished.
If it is not new, give a comprehensive Condition description (2). Let the buyer know what makes your item unique, including any interesting features or flaws.
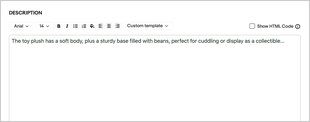
Enter an informative item description into the correspondent text field. Make sure that it is clear and concise, but be detailed enough so that there won’t be any confusion.
- Buyers trust simple, consistent formatting
- It's recommended sticking to one typeface with a black, 14pt font
- To save time, use templates
- HTML content won't be displayed on the first page of your View Item page on mobile. Since mobile buyers account for over 80% of traffic, consider minimizing your use of HTML as much as possible
eBay protects its users from malicious sites and spam, that’s why it does not allow links to other websites (with a few exceptions). Read more about eBay Links policy.
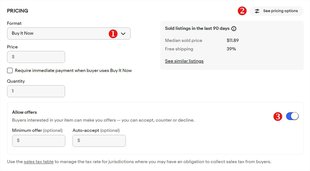
Step 7. Choose the format and price your item
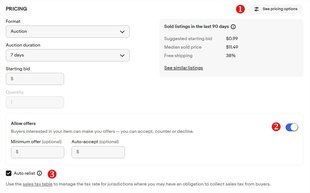
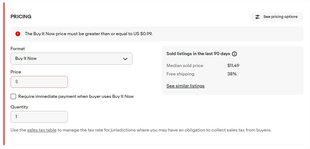
By default, the listing has a fixed price format (Buy It Now). Specify your Price and Quantity in the corresponding fields. In the gray box, there is information for your consideration: the median sold price of similar listings and the percentage of free shipping.
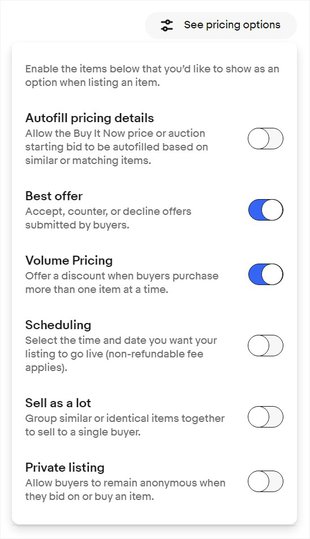
If you want to change the format, click the down arrow icon (1). To schedule your listing or make other adjustments, click See pricing options (2). If you want interested buyers to make offers, switch the Allow offers toggle (3) and set the limits.
For auction listings set your Price, an Auction duration, and your Starting bid.
Click See pricing options (1) to set the Reserve price, add the Buy It Now option, or schedule your listing. If you want interested buyers to make offers, switch the Allow offers toggle (2). The Auto relist option (3) allows you to automatically relist the item if doesn’t sell within the auction duration time. It can be auto relisted up to 8 times without insertion or optional listing upgrade fees.

Step 8. Set up shipping details
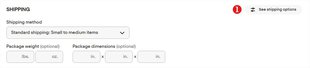
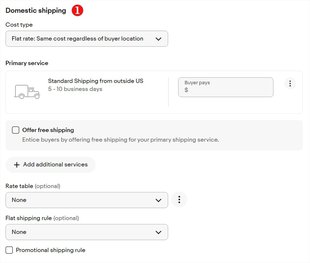
In the shipping section, you need to specify your shipping terms and the regions you ship your item to. You can go with recommended delivery options (if available) or select your own. You can also make this process more efficient by creating business policy templates. To enable or disable certain shipping options, click the See shipping options button (1) and use the toggles in the pop-up window.
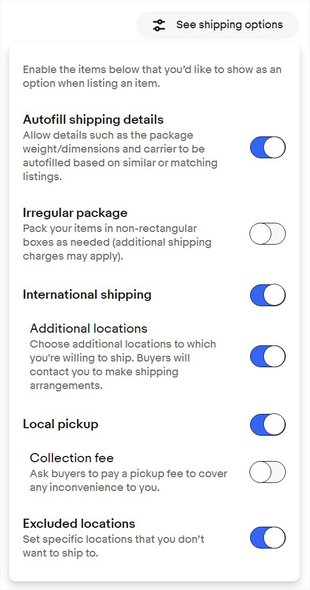
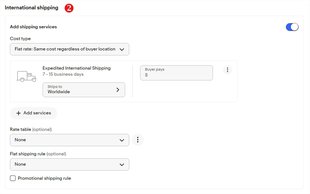
If you list your item on ebay.com, please remember that Domestic shipping (1) refers to the territory of the United States. To add shipment to other countries, enable the slider next to Add additional international service (2) in the International shipping section. If the item you’re selling is large or difficult to ship, offer local pickup (3) and the buyer can collect it in person.

Step 9. Reach more buyers
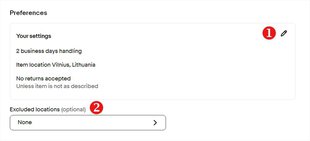
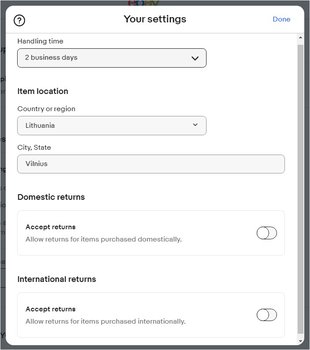
When you are done with the shipping options, please specify your preferences by clicking the pen icon (1) or anywhere within the Preferences box. Provide information about order handling time, item location, domestic and international returns. Select Excluded locations (2) if you don’t ship to certain regions or countries.
You can edit your payout or return settings in Seller Hub (under Payments or Order). Read more about returns in the article How returns work.
Whenever you create a listing, you need to specify shipping and returns details for your buyers. You can make this process more efficient by creating business policies. Learn how
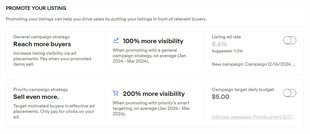
Improve your chances of selling with Promoted Listings.
General campaign strategy helps your listings reach highly motivated buyers through priority access to ad placements and advanced targeting controls. Only pay for clicks on your ads through the priority campaign strategy so you can drive more sales.
Priority campaign strategy can increase the visibility and awareness of your listings with general access to ad placements so you can reach more buyers. You’ll only pay when your item sells through a click on your ad.
You can also consider using Promoted Stores or Promoted Offsite.
Step 10. Set up charity option
If you want to support a good cause, eBay allows you to set up automatic donations of a certain percentage of your item’s final sale price. You will receive a donation receipt and discount for your fees of an equal percentage.
Click Edit (1) to find your favorite charity and specify the donation percentage. The organization’s logo and mission statement appear in your listing description, and the charity is notified when items are listed to benefit the organization. Learn more about listings with a charity option.

Step 11. Check and list your item
Your listing is almost ready. If you see a red warning box, it means that some information is missing or invalid. Such sections are marked with red lines and red exclamation marks.
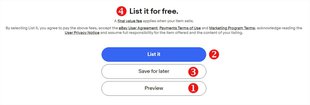
Select Preview (1) at the bottom of the page to see what your listing will look like to buyers.
If everything is OK, select List it (2). If you are not quite sure, edit it again or click Save for later (3). It will be saved as a draft, which you can revise and list later.
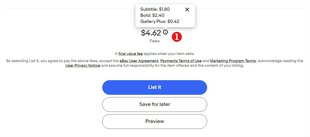
At the bottom of the page, you will see the total amount of fees that will apply (4). If you see the words List it for free, it means that there are no fees for listing this item, but a Final value fee will apply when you sell it.
If there are any paid options in your listing, you will see the total amount of fees (1) above the List it button. Click the information icon (ℹ️) to see the breakdown of this amount.
Once you have some listings up and running, go to Seller Hub or My eBay for all the tools you need to manage your eBay listings.

Useful articles about listing your item
Frequently asked questions
Why are you always changing things? I preferred the old listing tool.
Previously eBay had two listing tools for sellers, our basic listing tool and our advanced listing tool.
- To simplify the experience eBay has unified the features of both tools into one new listing tool
- You still have all the options you had in the old tool, but more-you can now easily add videos and edit/improve your pictures
- With the new listing tool, you upload your listing up to 10% faster! You have at your fingertips a streamlined and simplified user experience that helps you list your individual items in the most optimal fashion
I can't find some features that were in the old listing tool like Auction, adding a VAT number, Custom Labels SKU etc. Why have you removed these?
The new listing tool is a combination of our quick listing tool and advanced listing tool. If the feature you are looking for is not showing, simply click Edit all options in the relevant section to see all available options to you.
How many photos can I add to a listing?
24. The amount of photos you can add to a listing are the same as they were previous to this change.
How do I use the background removal tool?
- Hover over your uploaded photo and select the pencil icon.
- Select the Remove background icon.
- Frame the area of the image you want to keep, then select Continue.
- Use the eraser tool to remove more of the original image, or the brush tool to restore more of it.
- Select Save.
If you want to save your edited image to use for future listings, Right click then select Save as to download it to your device.
Can I still create multi-variation listings?
Yes, if your listing is Buy It Now, you will have module variations accessible.
If I have a previous listing I created previously to this change, will I need to edit multi-variations in my listing again?
No, your variations will appear in the variations module.
Why am I limited on the colors and fonts that I can use in my description?
eBay takes into consideration that most buyers like simple and consistent descriptions. Bright colors can be difficult to read and underlined text could be confused as a hyperlink. eBay wants to help sellers creating the perfect listing.
Why are my descriptions showing as blank?
eBay is aware that a browser plugin called LanguageTool can cause descriptions to appear blank. You can tell if the LanguageTool plugin is enabled if you find an “It-” prefix in the HTML of the description. To resolve this you'll want to revise your listing as follows:
- In the Description section select Show all options.
- In the pop-up, select See more options.
- Check the Show HTML code box.
- Search for (and remove) anything with an “It” prefix.
If I use HTML in my previous listings, will buyers no longer see the information within my HTML block on the listing?
You can still edit and add different HTML tags in the HTML mode.
Although you can make adjustments to HTML, eBay suggests that you do not enable HTML or add it to your listings since HTML is not optimised for Search Engine Optimisation (SEO) or mobile devices.
Focusing on your written descriptions without additional HTML added helps to ensure that your content is more friendly for search engines. Better ranking in search engines means more visibility and ultimately higher conversion rate.
How do I add a Buy It Now price?
Select Edit in the Pricing section and set the Buy it Now toggle to on.
How do I add free shipping to a listing
- In the Shipping section, go to Domestic shipping or International shipping (depending on your needs).
- Add the shipping service you want to use for free shipping.
- Enter $0.00 in the Buyer pays field or check the Offer free shipping box.
If you select free shipping, buyers see "Free" in the Shipping column in search results and on the View Item page.
Will I be able to use the “sell similar” function?
Yes, this will be visible across this new listing tool experience. Instead of logging into the Seller Hub to access “sell similar” functionality will be available on all eBay listing formats.
How do I know when my listing has all of the necessary elements completed?
Modules that are incomplete are marked with a red line on the left-hand side.
In addition, a message with an exclamation mark explains what is missing.