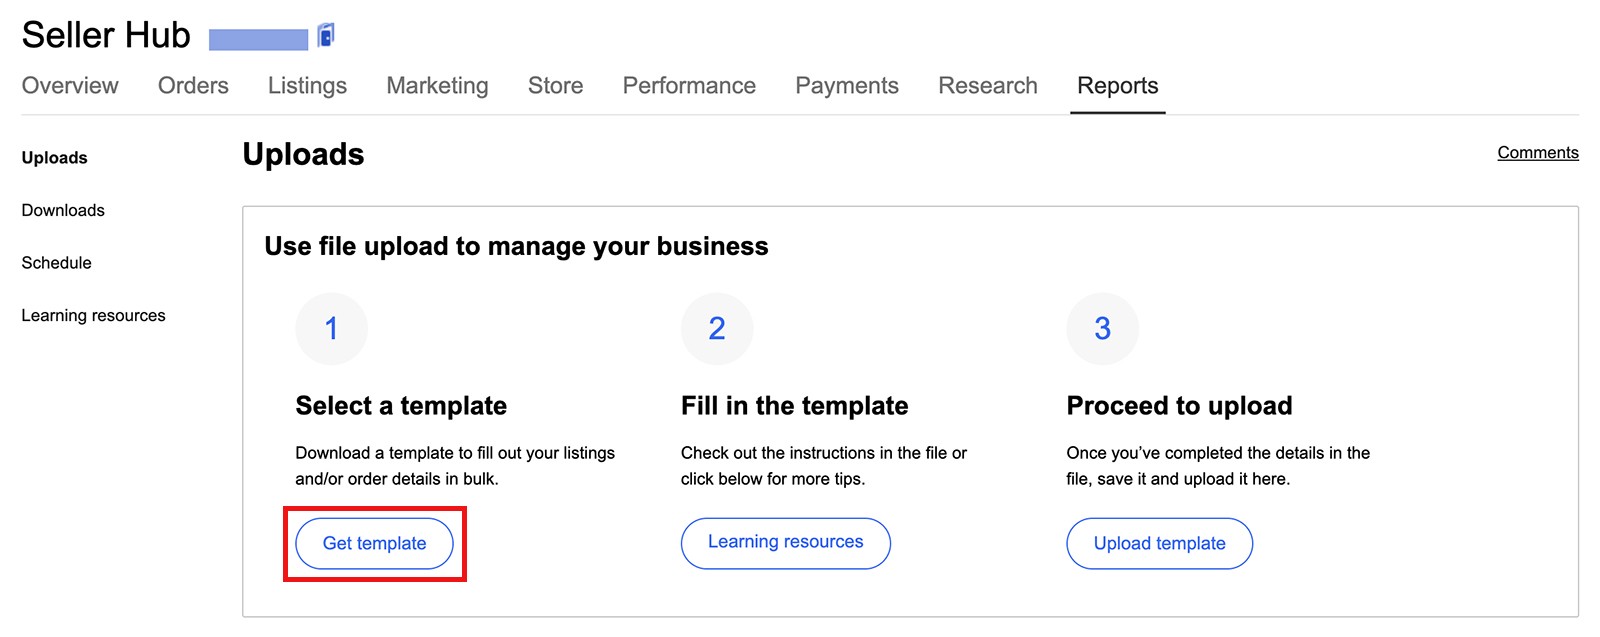
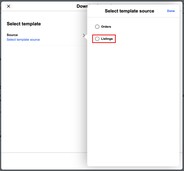
Seller Hub Reports, formerly known as eBay File Exchange, lets you upload and manage your inventory easily in CSV or XLS files. This is one of the most effective list strategies for high-volume sellers.

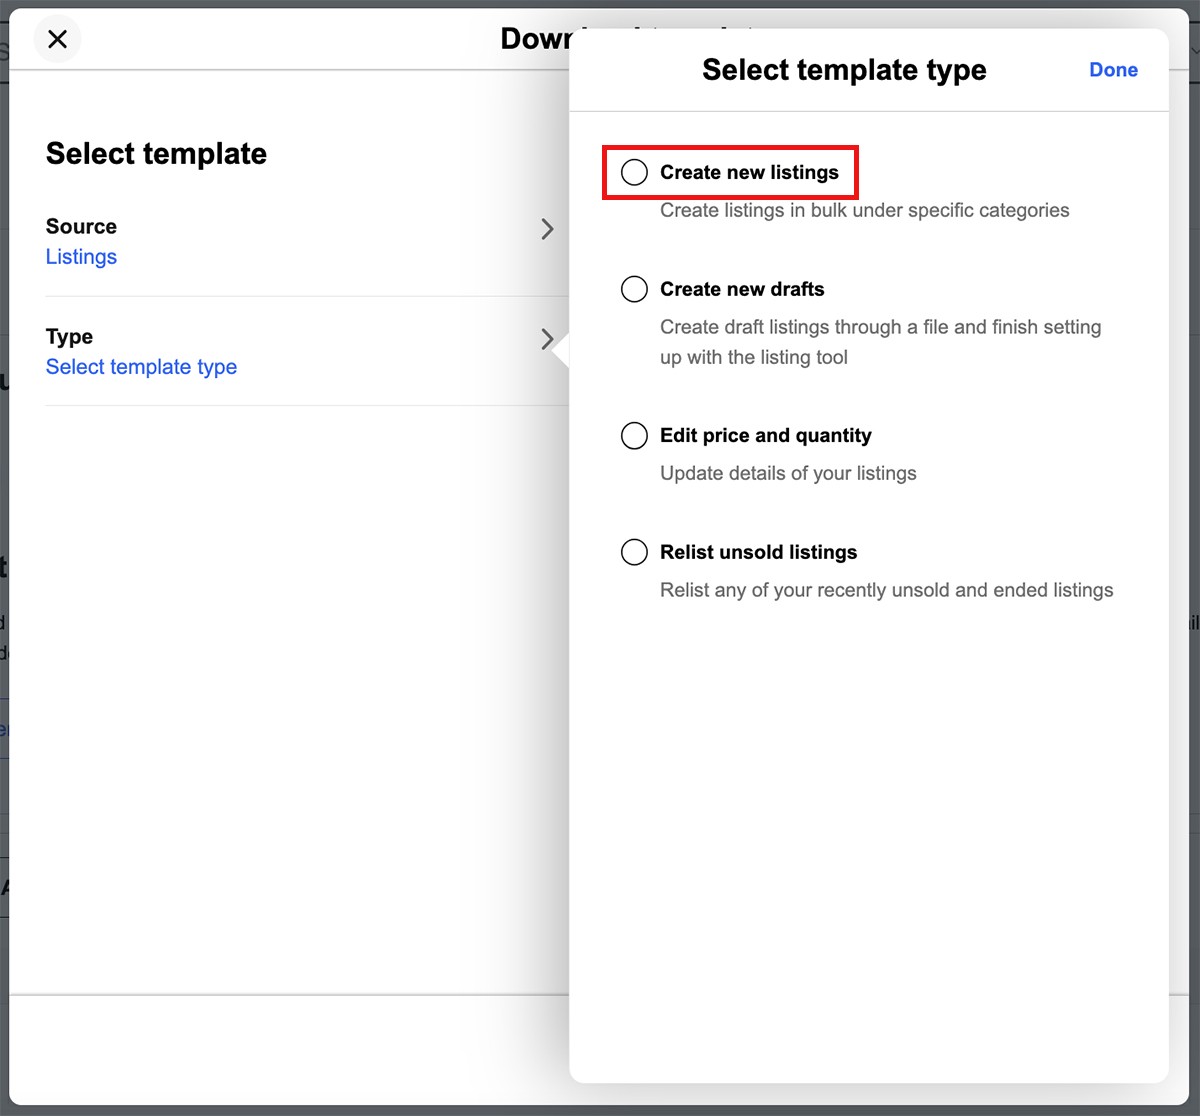

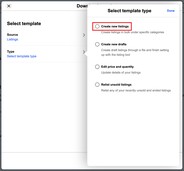
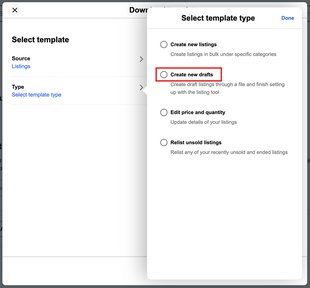
Creating new listings through the reports tab generally requires image hosting. However, you can use the Drafts template, leave the image URL column blank, and add images later when you're converting the draft to listings. To create a draft, simply select Create drafts template as the template Type on step 5. Then you can add images later when you're converting the draft to listings.
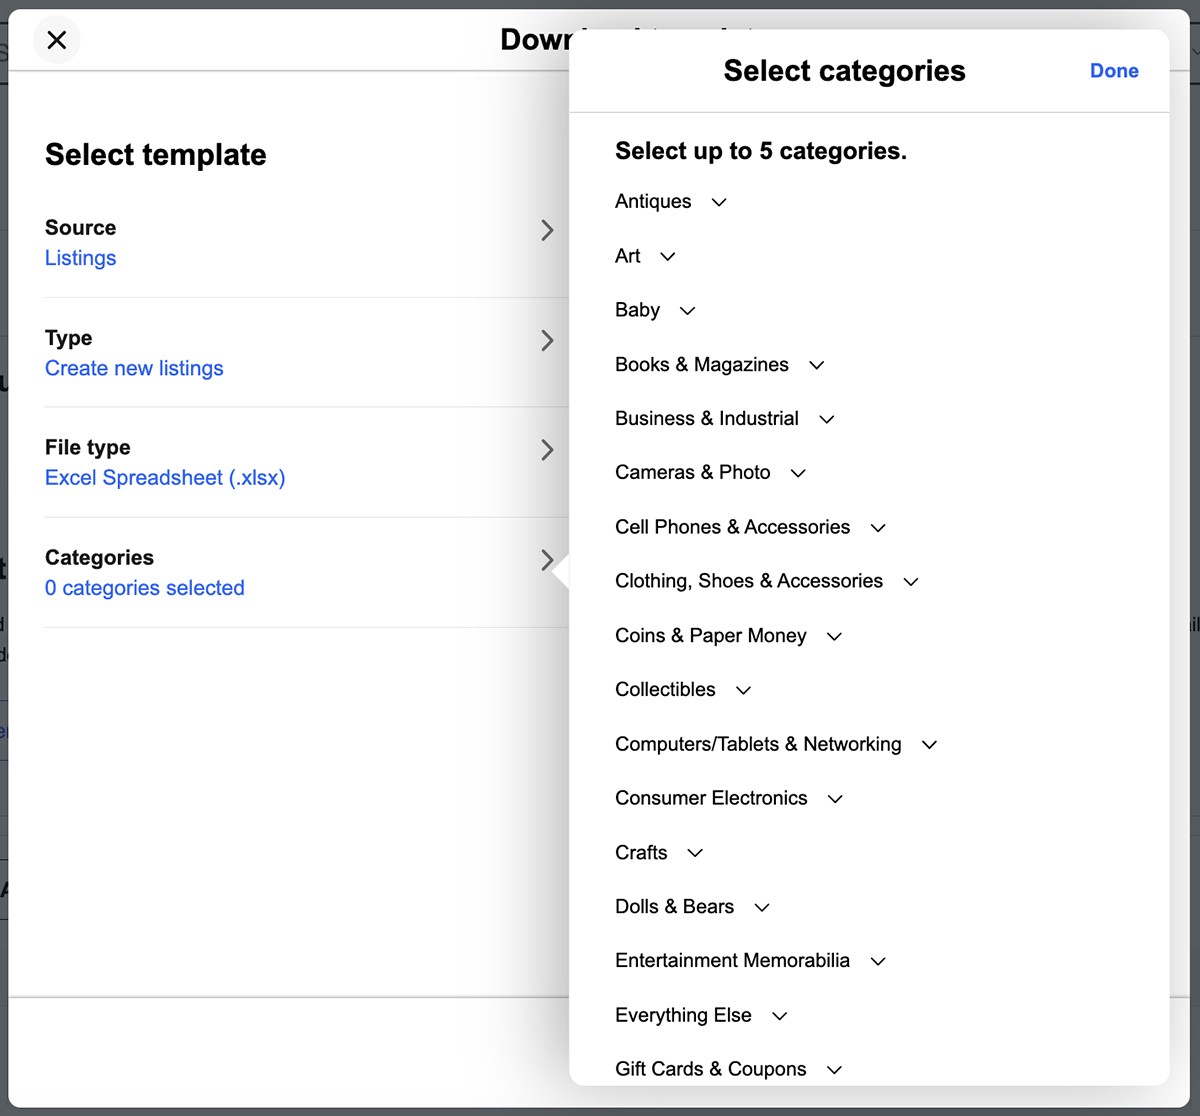
Category changes
- Relevant and up-to-date changes eBay periodically makes to the category structure helps to ensure that your listings appear in the relevant categories
- If and when the category structure changes, your listings may be automatically moved to a different category, based on the item specifics that you provided
- Aligning categories across international eBay sites will make cross-country trading on eBay sites easier
- You can find all category ID numbers needed for Seller Hub Reports here or inside of a category template


How to fill in templates
The downloaded template is an interactive, smart file that allows you to view header definitions, choose fields from dropdowns, and see helpful tool tips. Inside the file template you will find different colors to help you decide which cells to pre-fill, helping buyers narrow down their search results to find your listing.

Inside the template file, you'll find general instructions and a link to the full guide on how to complete your listings and customize them with advanced features.
Start filling from left to right using the Add action to add new listings and fill in each column:
- Hover your mouse over headers to see column header definitions.
- Click on the cell with missing fields.
- Click on the arrow that appears beside the cell.
- Select an applicable value from the list or enter a custom value, or leave it blank if none is applicable.

Note the color reference on each cell: it's important to fill in color-coded item specifics. These item specifics will help buyers optimize their search results: the more information you enter, the more buyers will be able to find your products.
Operations to manage eBay listings
“Add” operation (listing creation)
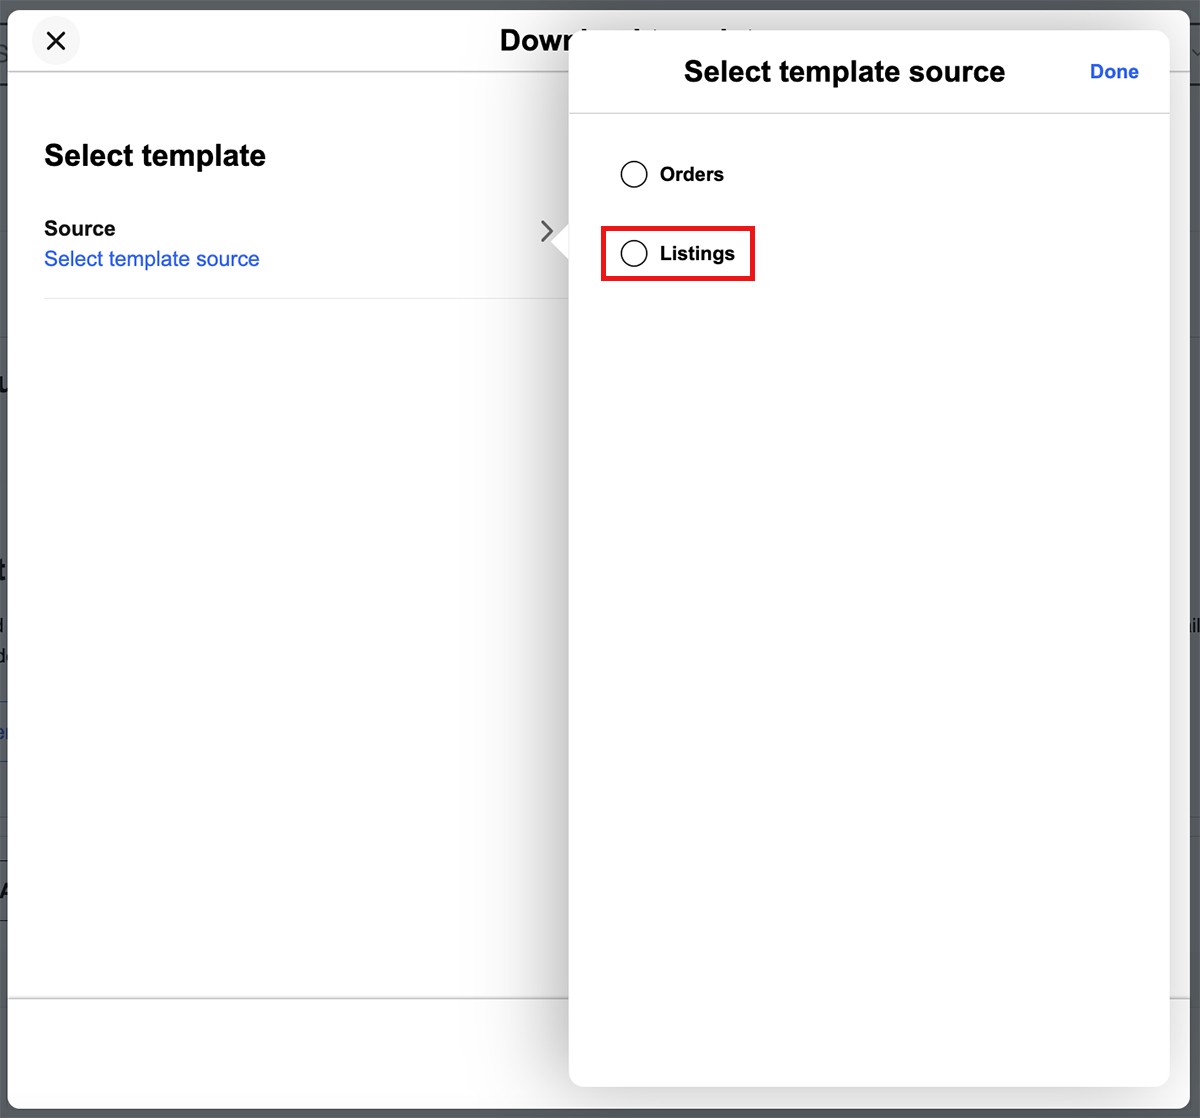
Once you've chosen the option Create new listings and selected other preferences, you will obtain a file which contains the mandatory and recommended characteristics of each category you want to publish your items:
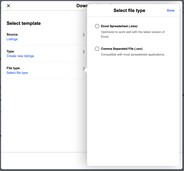
- If you have selected the CSV file, on the same sheet where the columns are located, you will see an information section, where eBay provides recommended values to include in the item specifics
- If you have selected the XLSX file, you will have different sheets where you can find the instructions and recommended value to upload the products
In addition to the characteristics of each category, you will have to fill in a series of data to correctly upload your listings. Here is a list of the mandatory fields which must be filled in:
- Action: this column requires to introduce the value Add for every item you want to publish on eBay
- Site ID: this field represents the site ID where the listing is going to be published. For example: UK. See the site IDs list
- Country: the country codes. For example: GB (United Kingdom). Сheck the country codes list
- Currency: the designated monetary system. For example: GBP. See the currency codes list
(SiteID=UK|Country=GB|Currency=GBP|Version=1193|CC=UTF-8) Introducing SiteID, Country and Currency on the header/column name, all listings included in the file will be published on the same eBay site (UK in this case). If you want to publish listings on different sites, then you will have to create new columns called SiteID, Country and Currency, and the correspondant values for each listing.
- Custom label (SKU): this would be the product SKU (Stock Keeping Unit), a user-assigned product identification label (an identification code)
- Category: the numerical identifier of the eBay category. For products with variations, you will only fill in this field for the parent product. This must always be a final category, and not an intermediate one. See the complete tree with eBay categories
- Store category: your Store categories identified. As using shop categories is optional, this is not a mandatory field
- Title: the primary name that appears at the top of your listing, 80 characters maximum. In case of multi-variation listing, you will include titles only on parent products
- Condition: the numerical identifier which specifies the product condition. For example: 1000=New. You can find all possible Condition IDs for the different eBay categories using this free tool
- UPC/ISBN/EAN: the Universal Product Code or other product code will be included in this field. In its absence, you will insert the value Not applicable
- Item photo URL: you can enter the images URL in this field. You can add up to 12 images for each listing, and URLs must be separated by a vertical bar ( | ), without spaces. Learn more on using images with your listings below
- Format: you can choose between auction style and fixed price listing. Default entry is Auction. In case of fixed price items, you will have to insert the value FixedPrice
- Description: in this field, you will describe basic, special and unique features of your listings. In case of multi-variation listings, descriptions will only be indicated on parent products
- Duration: for fixed price listings, always use the value GTC (Good ’Til Canceled). This means that your listing will be automatically renewed every 30 days. Valid auction durations include: 1, 3, 5, 7, and 10 (days)
- Price: this field indicates the price at which bidding starts for an auction (accepts decimal point but no currency symbols). If the listing is in fixed price format, this is the price to buy the item. Enter the price value on each variation in case of multi-variations listings, and never on the field for the parent product
- Quantity: this field indicates the number of items available for sale. A quantity of more than 1 implies all the items are exactly the same. In case of multi-variations listings, you will also include stock on each variation, and never on the field for the parent product
- Location: this field indicates the geographical location of the item. Enter postal code of your store or warehouse
- Shipping profile name: the exact name of the shipping policy already defined on your Business policy page
- Return profile name: the exact name of the return policy already defined on your Business policy page
- Payment profile name: the exact name of the payment policy already defined on your Business policy page
- Item specifics (C:Brand, C:MPN etc.): to introduce item specifics, such as Brand or MPN, you will need to create new columns with headers like these
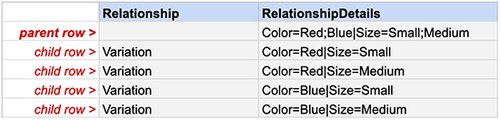
- Relationship / Relationship details: item variations will be defined on these columns.
- For the parent item, you will leave the field Relationship empty. The parent row should only contain the normal listing information, like Action, Category, Format, and other shared information (like shipping and returns options) that apply to all the variations in the listing — but do not add any of this information to your child rows
- For the child items, you will insert the word Variation for all variations on the field Relationship. Then you will have to specify these variations on the field RelationshipDetails: insert the name of the variation specific followed by an equals sign (=), and separate each value with semicolon ( ; ). To add another variation specific, you will repeat this on RelationshipDetails column, separating variations with a vertical bar ( | )
Using images with your listings
The structured template file enables you to list vivid images of your items to showcase to your buyers, thus allowing them to make purchasing decisions faster. Photos need to be provided in the file template via URL links to the web-hosted images. Insert URL information in the field called Item photo URL.
The photo URL needs to start with the hypertext https:// and end with a file extension like .jpg or .png. Pictures can be self-hosted, hosted by a third party, or hosted by eBay Picture Services (EPS) through eBay’s API integration. There are many photo hosting services available and most are compatible.
eBay recommends a minimum of 500 pixels on the longest side, 800 pixels on the longest side to enable the buyer to zoom the picture in the listing page. For best results, 1200 pixels is Optimal.
Find out more tips for taking great photos
You can add up to 12 photos on the parent row and each variation row. When doing so, use the pipe ( | ) character to separate the values. Here is an example of how you can list with multiple images:
https://www.picturshostingsite.com/picturefolder/picturename1.jpg|https://www.picturshostingsite.com/picturefolder/picturename2.jpg|
If an image URL has blank spaces, you must replace the blank spaces with %20; otherwise, the image will not appear in the listing.
“Revise” operation (update listings)
You can use the revise file to update information about your active listings. It allows you to modify your listing's information: stock, prices, titles, and many other aspects.
The template file provided on the Uploads section includes a complete list of all active listings, so you can easily modify the information and then upload the same file to eBay. You will even be able to add new columns in case you need to modify other aspects which aren't included on the obtained file. Anyway, this will be faster and more comfortable than creating a revise file from scratch.
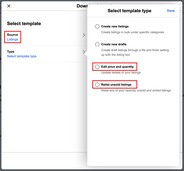
If you’ve chosen the listing template type “Edit price and quantity”, this file will include the following fields:
- Action: with the value Revise
- Item number: Item ID of the items. In case of multi-variation listings, his information will only appear on the parent product row
- Title: listing title
- Listing site: publication site
- Currency: the designated monetary system
- Start price: the price at which bidding starts for an auction, or the price to buy the item if the listing is in fixed price format
- Buy It Now price: you will only use this field in case you want to set a Buy It Now price for an auction
- Available quantity: the number of items available for sale
- Relationship: you will see the value Variation on every variation row
- Relationship details: which includes the variation specifics
- Custom label (SKU): a user-assigned product identification label (Stock Keeping Unit)
If an existing listing contains no variations, you cannot revise that listing to include variations. Instead, you must end that listing, and then create a new listing with variations.
“End” operation (Remove listings)
You can use the revise file to end the items you don't want to sell on eBay anymore. This is a really simple file which only requires 3 columns:
- Action: enter the value End
- Item number
- Ending reason: the reason why you are ending the listing. You can choose among different options: LostorBroken, NotAvailable, Incorrect, OtherListingError
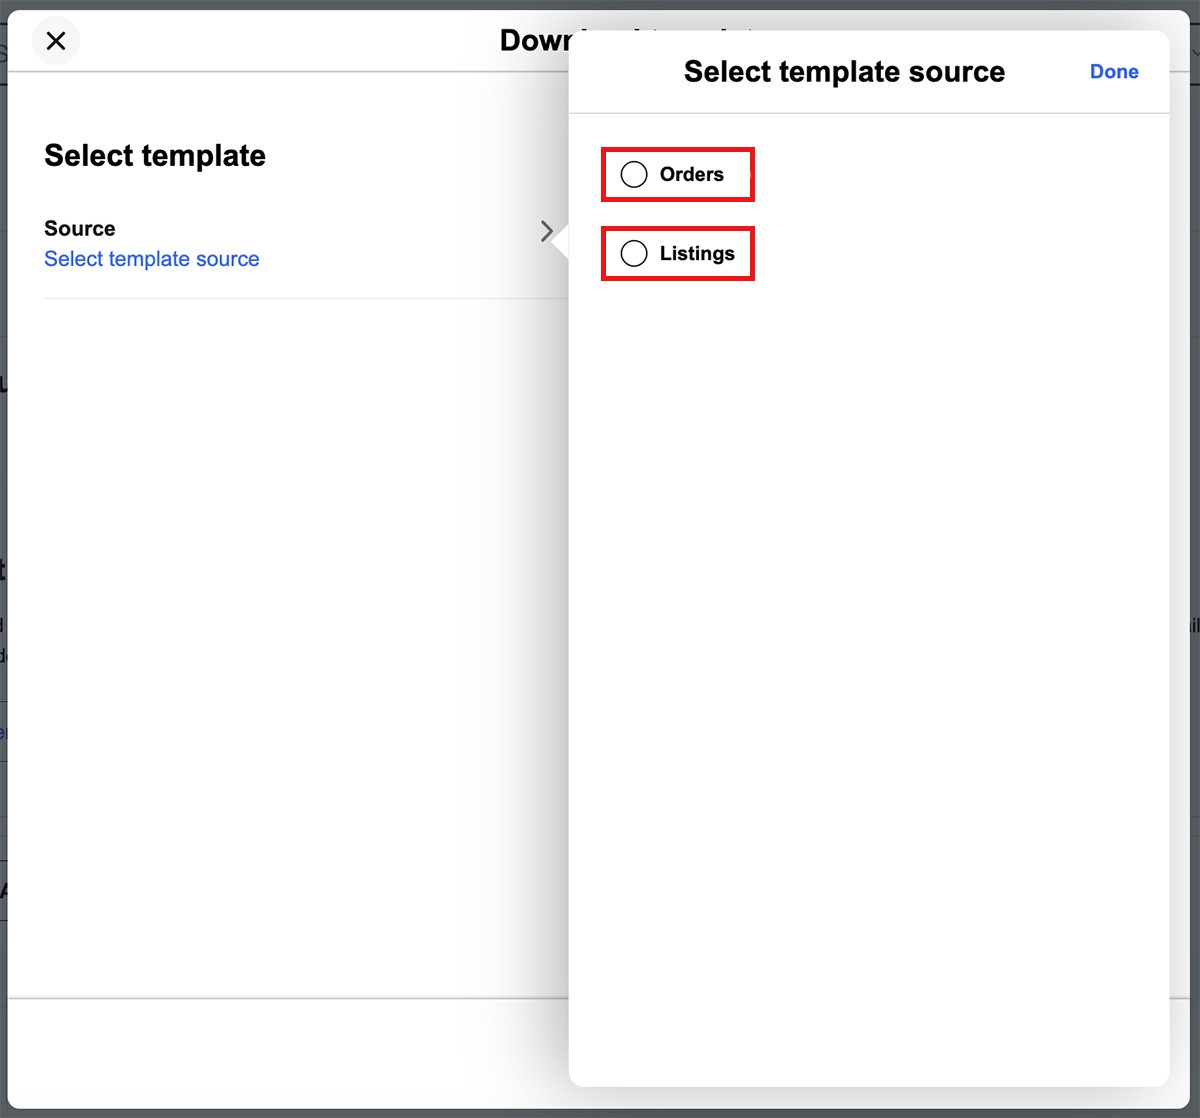
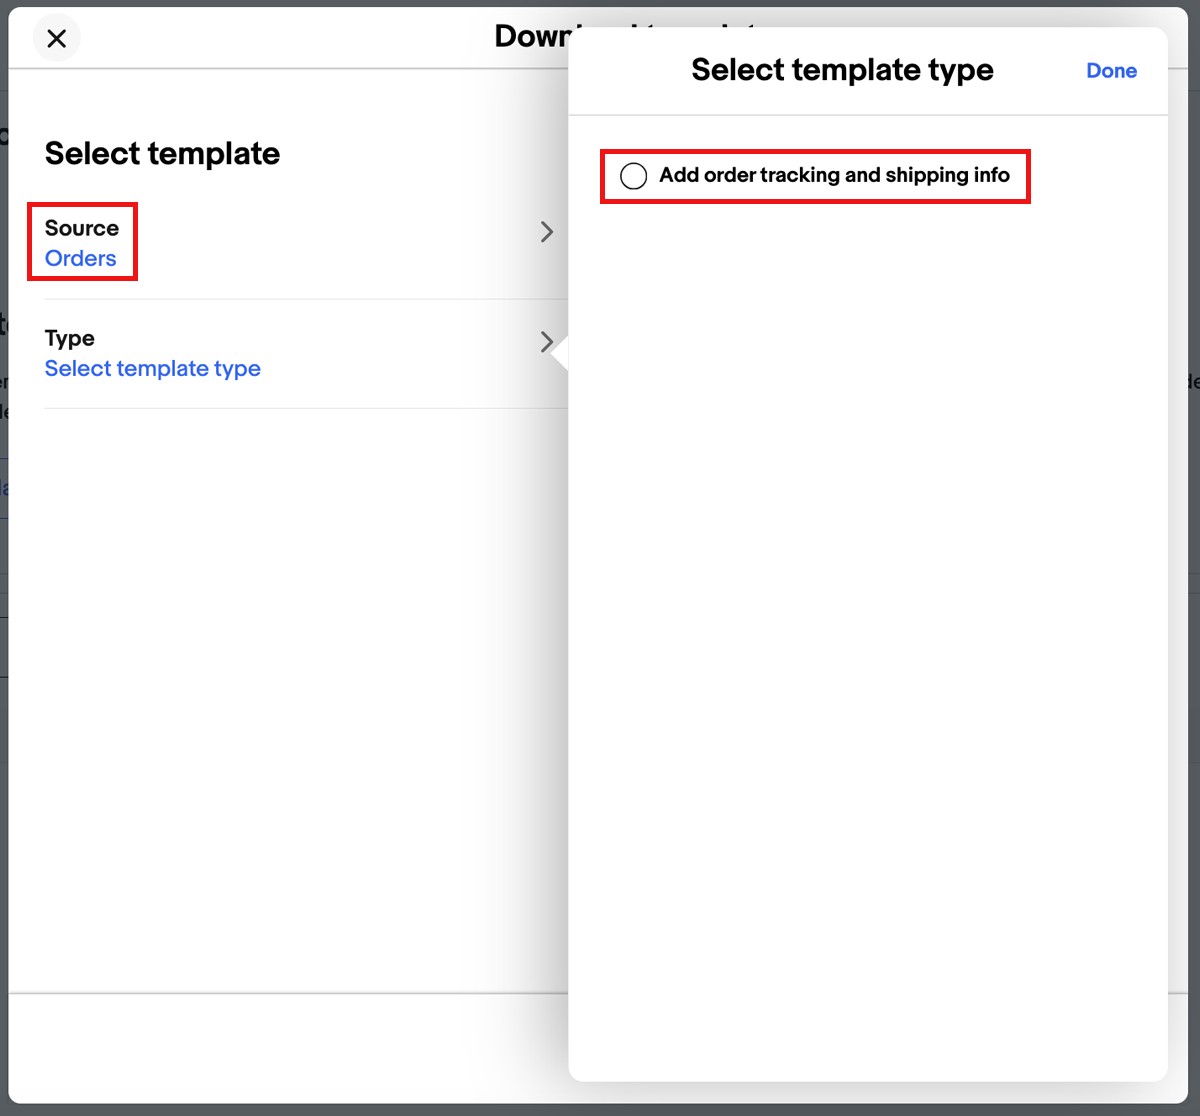
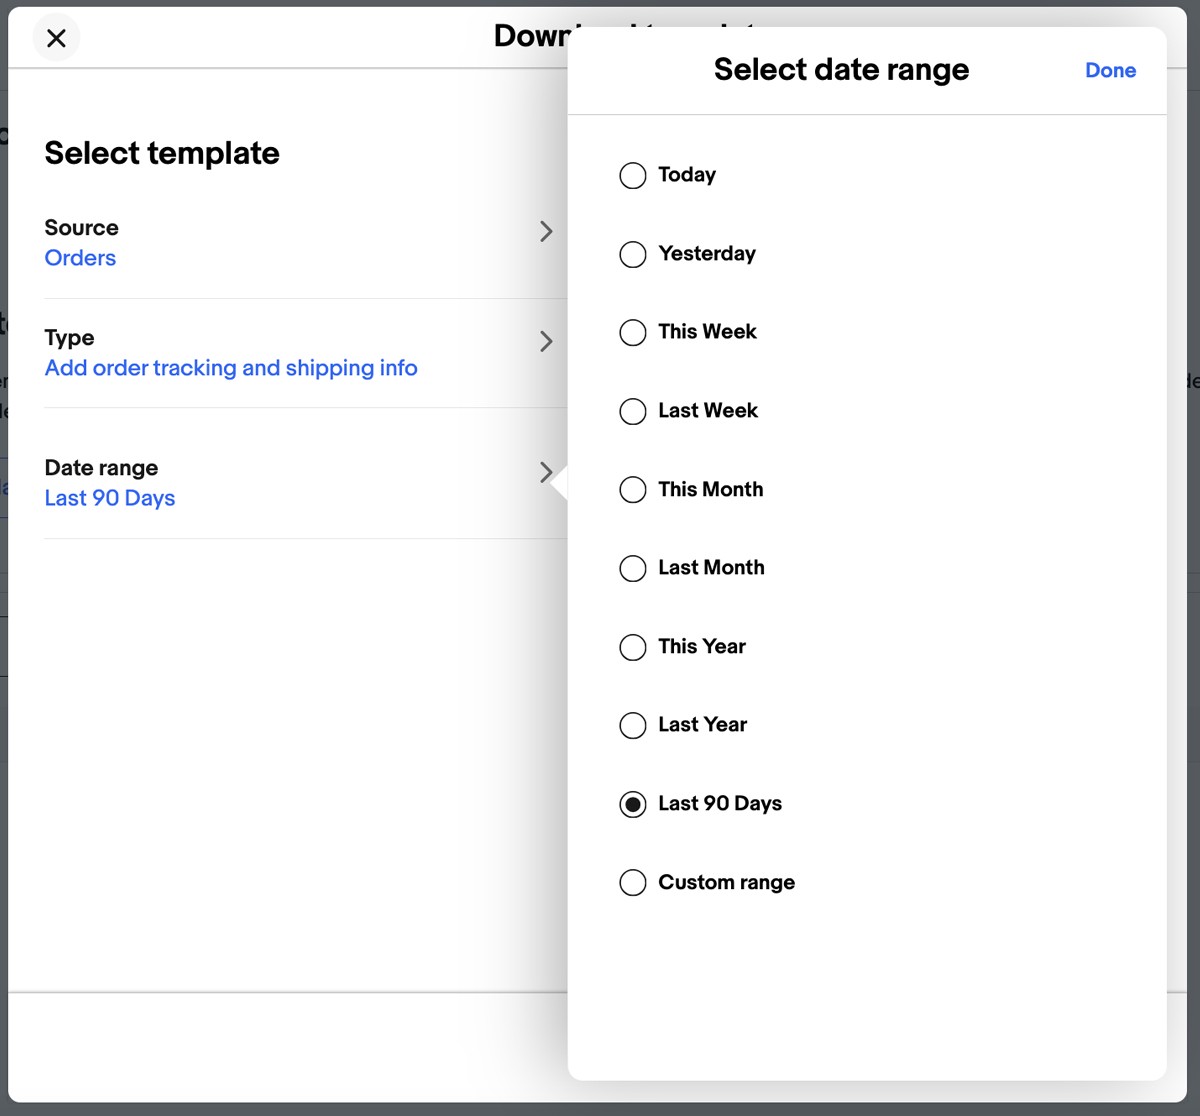
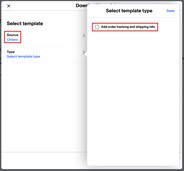
Adding tracking information to orders
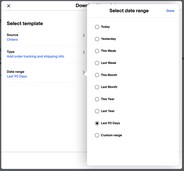
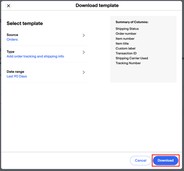
You can easily add shipping and tracking information to orders through CSV files by choosing the appropriate option and date range when you download the template.
These are the fields you will use to update the tracking number:
- Shipping status: you can choose among Shipped or NotShipped options. The Shipping status field is not mandatory. If you provide tracking information, the system will interpret it and mark it as Shipped
- Order number
- Item number
- Item title
- Custom label
- Transaction ID
- Shipping carrier used: identifies a shipping carrier used to ship an order, and the countries served by that carrier. Check all different carrier names here
- Tracking number: in order to use the Tracking number field, you will also have to provide a value for Shipping carrier used
How to upload completed templates

1. Go back to Seller Hub Reports.
2. Select Upload on the left-hand side.
3. Select the Upload template button.
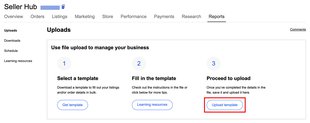
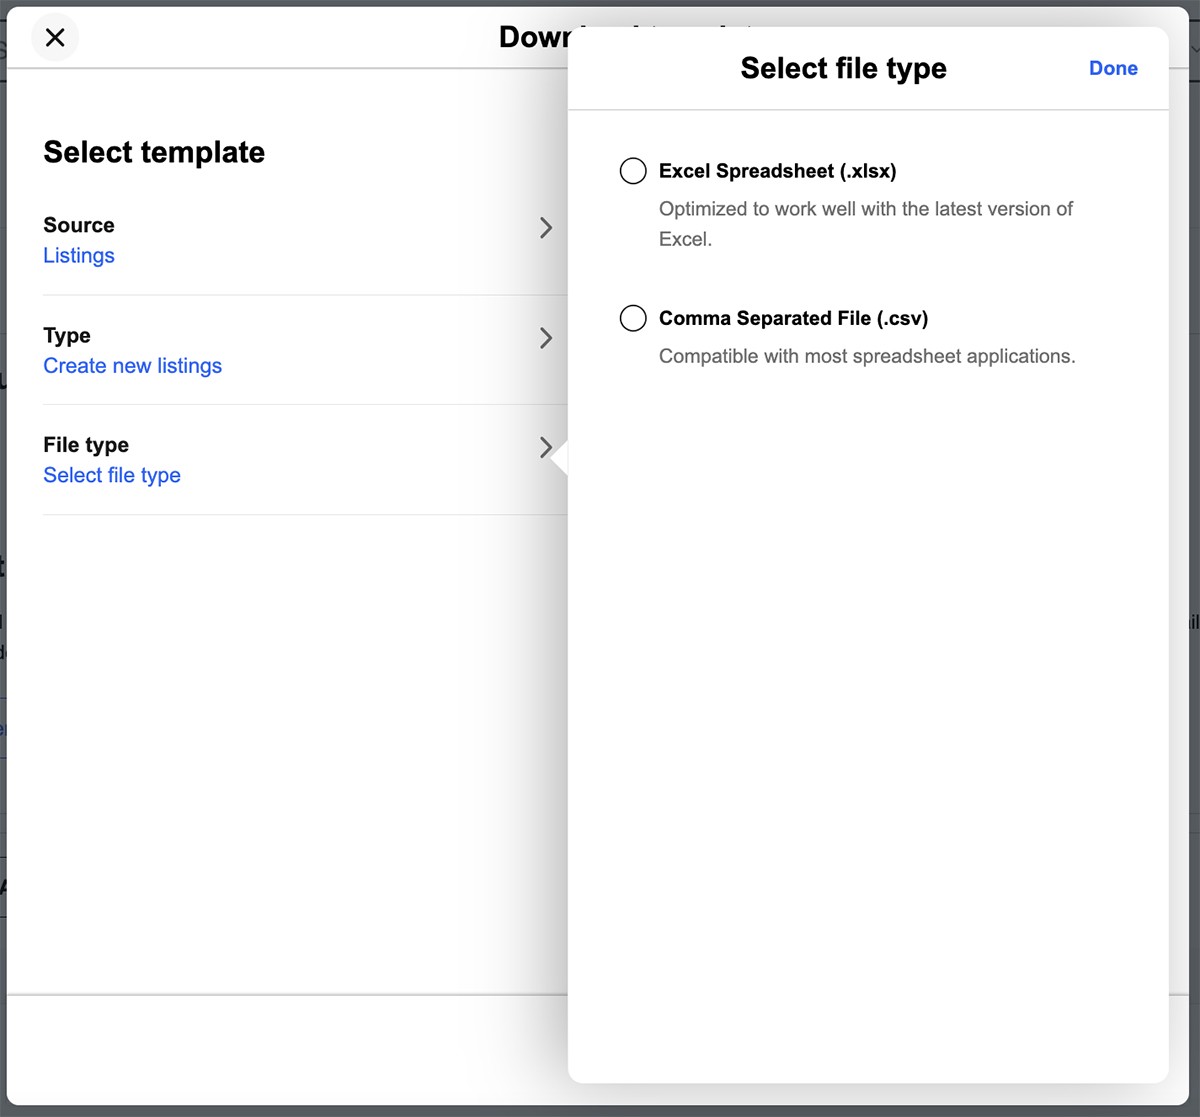
4. Choose .xlsx file type if you plan to use Excel, otherwise choose .csv file type.
5. Select the template type you're uploading.
6. Select Upload.
