Once you’ve purchased your eBay Store subscription, the basics are done. Now it’s time to figure out how to personalize the design of your page and make it home for your business to attract more customers.
Here are the features you can adjust to stand out from competitors. You can find them on the Store tab in Seller Hub. If you haven't opted in to Seller Hub, you can do so when you select Manage eBay Store.
1. Store name
You can use your eBay username for your Store name, therefore it’s better to choose something that looks more professional and represent your brand. You can choose it at the very stage of getting your subscribrition. Be aware that your store’s URL will be determined by the name you chose.
While you can change the name of your eBay Store in Seller Hub, eBay doesn’t advise this, because since then, any bookmarks, tags or links created by your buyers won’t work and your store will be considered as a new site by some search engines.
If you still want to change the name of your eBay Store, the new name can’t be:
- The username of another member on eBay, or be misleadingly similar to the username of another eBay member
- Identical or misleadingly similar to another company’s name that’s protected by trademark law
- A name that contains the word “eBay,” or a name which is misleadingly similar to “eBay”
Before you rename your Store, read the article on intellectual property rights and using eBay’s intellectual property.
How to add a Store name:
- Go to Store tab in Seller Hub.
- If necessary, сhoose Edit store in the left or top menu.
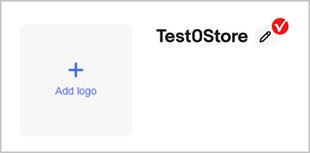
- Click the “pencil” button near the Store name, type the name of your Store (up to 35 characters) and save the changes.
2. Main image
The main image or the billboard of your store looks like a top banner of your site or a cover on your Facebook page and is aimed at attracting a buyer’s attention and making them learn more about your brand, items and even seasonal updates.
It is placed as a banner at the top of your store page. The image should be 1280 x 290 pixels and less than 12MB. You can add your slogan or other features reflecting the values of your brand.
Use the main image as an effective tool for communicating with potential buyers. Reinforce your branding in all customer contacts. For example, use your Store colors and imagery in your advertising, emails, and especially your eBay listings.
How to add your Main image:
- Go to Store tab in Seller Hub.
- If necessary, сhoose Edit store in the left or top menu.
- In the corresponding field, select Add billboard image (the + option).

3. Store logo
Your logo should represent your business in a direct and professional way, re-emphasize your values and be consistent with the overall identity of your brand. Your logo size should be 300 x 300 pixels and less than 12MB. When editing your logo, you can also use simple built-in tools like VistaCreate.
How to add your Store logo:
- Go to Store tab in Seller Hub.
- If necessary, сhoose Edit store in the left or top menu.
- In the corresponding field, select Add logo (the + option).

4. Store description
Next, when managing your Store, you will find two main tabs: Tell your story and Stage your story. Let’s start to Tell your story with a short description about you and what you sell to educate buyers about your Store.
This section is aimed at detailing the items you sell and your advantages as a seller. In order to make your Store description an effective marketing tool, put your main keywords in the description to ensure your store is well displayed in search results.
Your Store description can be found on the About tab on your storefront. It has a 1000 character limit and will be automatically translated to the native language of your Store’s visitor, depending on their location.

How to add your Store description:
- Go to Store tab in Seller Hub.
- If necessary, сhoose Edit store in the left or top menu.
- Select Tell your story section.
- Enter the description in the corresponding field.

5. Store video
Sometimes it’s the story behind a business that makes the sale. By letting your buyers know the history, values, and passion that goes into your business, you can help them understand what makes your business unique and inspire them to buy from you.
Add a video to share what makes your Store special — introduce yourself and your business. Consider covering what kind of products you sell, how long you've been in business, what your mission is, etc. Stores with a seller video have up to 33% more conversion!
Here’s how to add a video to your Store:
- Go to Store tab in Seller Hub.
- If necessary, сhoose Edit store in the left or top menu.
- Select Tell your story section.
- Under Store video, select Add video (the + option).
- In the pop up, you can choose to Upload video or Design with VistaCreate.

Once your video is uploaded, you'll see a message saying that the file is being reviewed. This review typically takes 48 hours. If the publication is denied, you will see a message explaining why.
Your video should be:
- In .MP4 or .MOV format
- Less than 150MB
- Comply with eBay’s Images, videos and text policy
The first frame of your video will be the image customers first see. The image in the video must not be blurry or distorted, contain illegal or offensive content, or encourage buyers to go to third-party sites.
Buyer have the opportunity to complain about a video. If the uploaded video is found to violate eBay policies, eBay will submit a video removal request and notify you by email. You will have the opportunity to reply to this email for clarification.
6. Store policies
In this section, you can set up basic policies that apply to all listings. Describe the basic rules for shipping, guarantees, returns: they will be displayed in your Store, and buyers will be able to get acquainted with them.
How to create Store policies:
- Go to Store tab in Seller Hub.
- If necessary, сhoose Edit store in the left or top menu.
- Select Tell your story section.
- Under Store Policies, choose a policy from the Select policy (1) dropdown and click Add policy (2).
- Type or copy and paste your policy into the text field. Keep in mind, there's a 4000 character limit on policies, and your policies should be applicable to all listings in your Store.

7. Store categories
Having an eBay store allows you to divide your items into categories or departments and customize them as you wish. You don't need to use the standard categories on the eBay site — you can create up to 300 unique Store categories to help organize your listings and display your items to buyers. You can also put items into two Store categories at a time at no extra charge.
To create a category in your eBay Store:
- Select the Store tab in Seller Hub.
- Select the Store Categories menu on the left-hand side.
- Select Add Categories to add up to 5 categories at once that best fit the items you're selling.
Select Save.
You can also add subcategories by selecting Edit next to the categories on the Manage Store Categories page. However, you won't be able to create subcategories if your categories already contain listings.
If you'd like to delete or rename a category, simply select Edit next to it.
To move a listing to a different category:
- Go to Active Listings under Listings in Seller Hub.
- Select the listings that you want to move and select Edit.
- Choose the new Store category under Listing details and select Update listing.
To edit multiple listings at once, simply pick the ones you'd like to update, select Edit, and then Edit all listings.
Note that your Store categories don't need to match eBay's standard categories. To make it more user-friendly, your categories and subcategories can be clickable, providing links to appropriate custom pages.
Once you've created your categories, you can choose to feature up to 6 categories on your storefront to help buyers shop by category. Here's how:
- Go to Store tab in Seller Hub.
- If necessary, сhoose Edit store in the left or top menu.
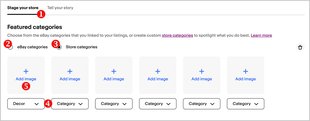
- Select Stage your story section (1).
- Under Featured categories, select either an eBay (2) or a Store category (3) that you'd like to spotlight.
- Select a category from the Category menu (4).
- Select Add image (5) and choose your image (it’s best to use a square image that's 300 x 300 pixels).
To set up the category type you would like to display on your Store:
- Go to Store tab in Seller Hub.
- If necessary, сhoose Edit store in the left or top menu.
- Select Stage your story section.
- Under Category Preference, select either an eBay categories or a Store categories.

8. Featured items
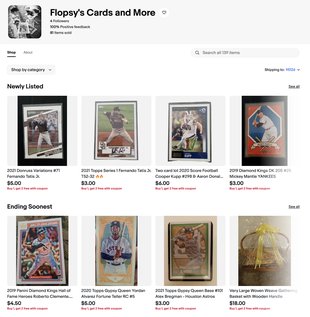
Featured items are placed below your Store’s description but above your main product inventory. You can choose which items are placed in your featured bar. Use this section to highlight particular items from your inventory. Choose your bestselling and most popular products, as well as the items that summarize your inventory in the most attractive way. You can also show newly listed or ending soonest items in automated inventory strips. In addition, if you’re running a sale on selected products, we recommend featuring these items to enhance promotion.
How to feature your listings:
- Go to Store tab in Seller Hub.
- If necessary, сhoose Edit store in the left or top menu.
- Select Stage your story section.
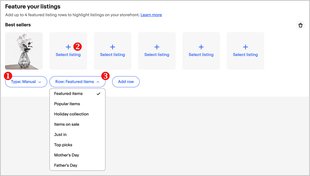
- Under Feature your listings, you'll see a Type option (1) to choose either Manual or Automated when adding an inventory strip.
Once you select Manual, then click Select listing (2) and choose the listing you want to recommend, and the Row (3) in which the selected listings will be shown. When you are creating inventory strips manually, you can choose to display your items under different row titles, such as Featured items, Popular items, Holiday collection, Items on sale, Just in, Top picks etc.
Once you select Automated, then a second dropdown will populate with the automated options. Upon choosing an option and adding the row, you will see an explanation of what to expect on the storefront.
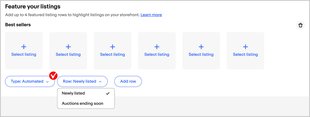
Automated inventory strips allow sellers to show their newly listed or ending soonest items in featured item strips without having to manually curate them. Since the inventory strips will always be fully populated, buyers will have a better experience when visiting storefronts.
9. Marketing banner
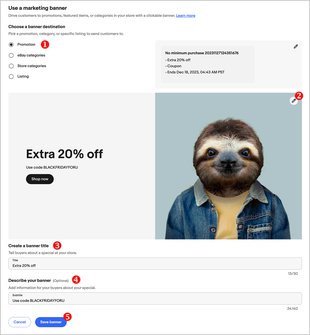
Create a clickable marketing banner to grab the attention of shoppers and redirect them to the item, category, or promotion page of your choice.
To create a banner:
- Go to Store tab in Seller Hub.
- If necessary, сhoose Edit store in the left or top menu.
- Select Stage your story section.
- Under Use a marketing banner, choose a banner destination (1): select promotion, category, or specific listing.
- Add a banner image (2), the image should be 640 x 640 pixels and less than 12MB.
- Enter a title (3) and description (4) in the appropriate fields, and then click Save banner (5).
10. Active promotions
All Store subscribers have the opportunity to highlight active promotions in the separate Sale tab on the storefront. This tab will feature all your coupon sales in one place, and make it easier for buyers to find your sale items.
The Sale tab will automatically appear when you have created at least one promotional coupon offer. (And eBay is exploring ways to include other promotions, such as markdowns, under the Sale tab in the future.)
Try coded coupons to make them the focus of your storefront — helping turn browsing visitors of your Store into happy buyers.


